sbnotes
Topic 002 : Spring Framework Overview
Topic 002: Spring Framework Overview
Jakarta EE vs J2EE vs Java EE
- Jakarta EE (Jakarta Platform, Enterprise Edition)
- Java EE (Java Platform, Enterprise Edition)
- J2EE (Java 2 Platform, Enterprise Edition)
Jakarta EE
- Jakarta Server Pages (JSP): Used to create dynamic web pages.
- Jakarta Standard Tag Library (JSTL): Used to show dynamic information on web pages.
- Jakarta Enterprise Beans (EJB): Used to create enterprise applications.
- Jakarta Restful Web Services (JAX-RS): Used to create RESTful web services.
- Jakarta Bean Validation (JSR-303): Used to validate Java objects.
- Jakarta Contexts and Dependency Injection (CDI): Used to inject dependencies into Java objects.
- Jakarta Persistence (JPA): Used to persist Java objects into a database.
- Jakarta Server Faces (JSF): Used to create user interfaces for web applications.
- Jakarta Expression Language (EL): Used to evaluate expressions in Java applications.
- Jakarta WebSocket: Used to create WebSocket applications.
- Jakarta Batch: Used to create batch applications.
- Jakarta Concurrency: Used to create concurrent applications.
Spring 5 - Java EE (javax.)
Spring 6 - Jakarta EE (jakarta.)
Spring Framework
Spring Framework is an open source Java platform that provides comprehensive infrastructure support for developing Java applications. Spring Framework is the most popular application framework for enterprise Java. Spring Framework is an open source framework for the Java platform. It is used to build Java enterprise applications.
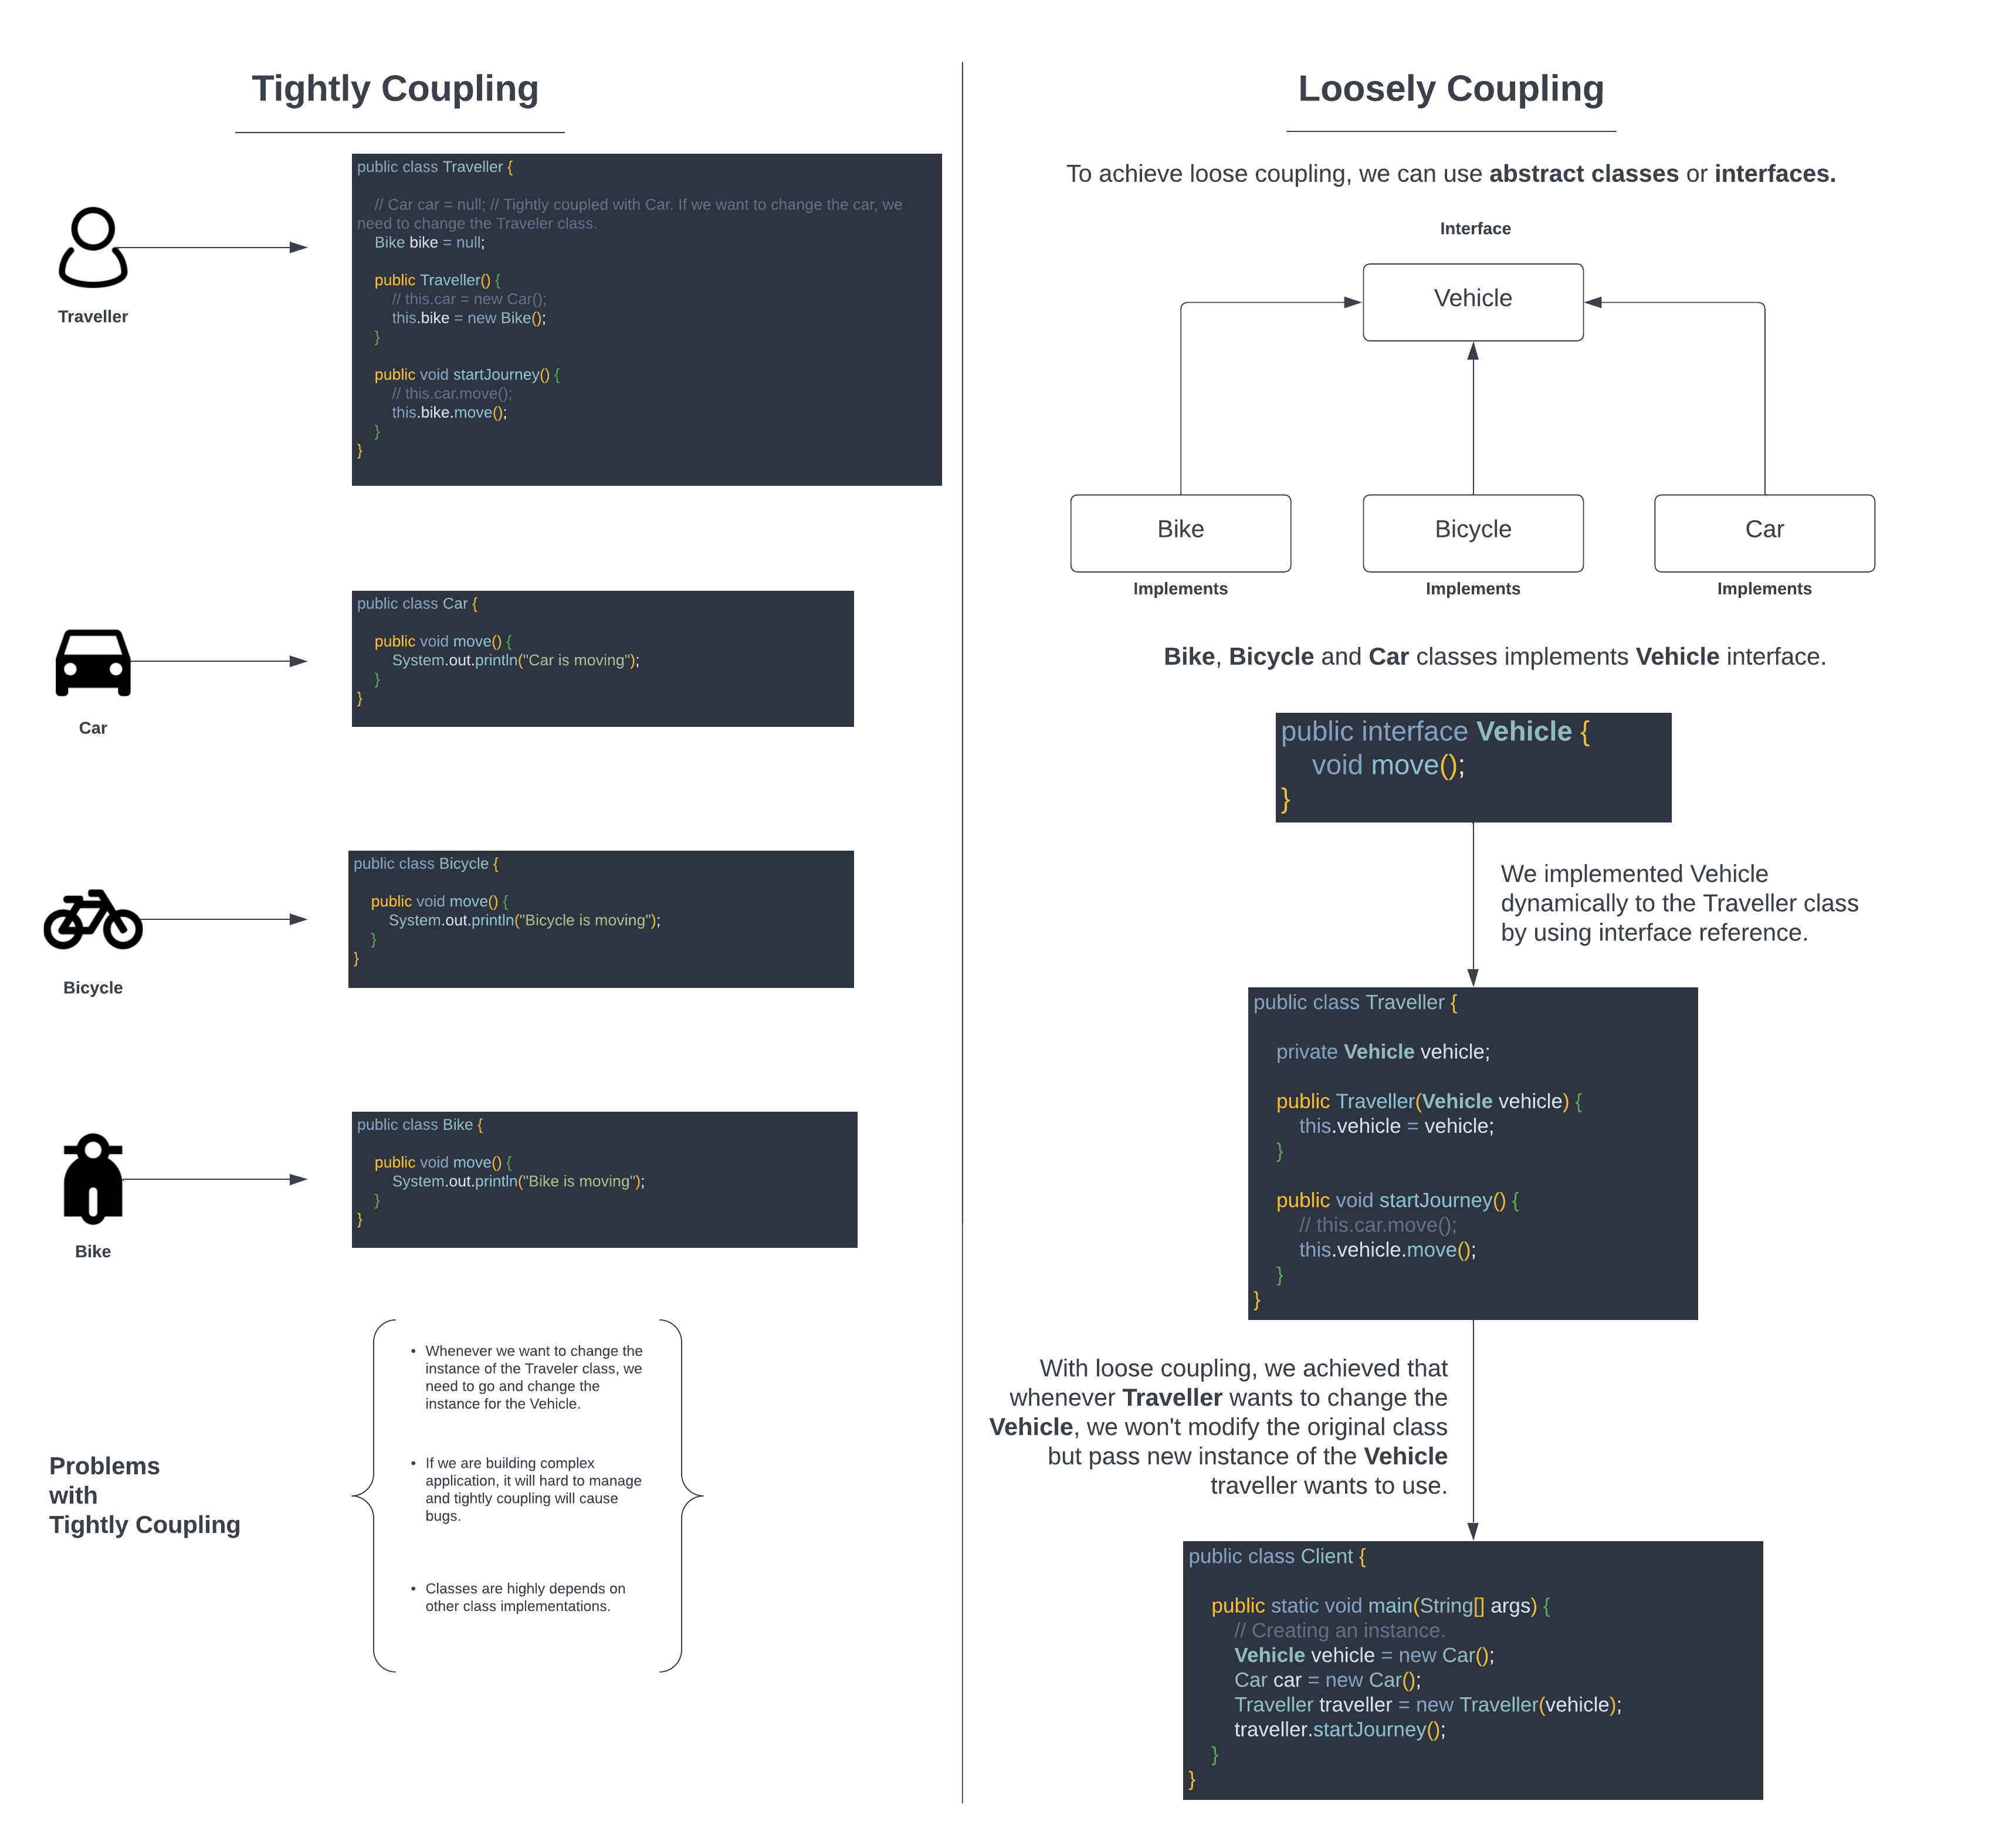
Tight Coupling vs Loose Coupling
- Tight Coupling: When two classes are tightly coupled, they are dependent on each other. If one class changes, the other class will also change.
- Loose Coupling: When two classes are loosely coupled, they are not dependent on each other. If one class changes, the other class will not change.
In the example below, GameRunner class has a dependency on GamingConsole. Instead of wiring game object to a specific class such as MarioGame, we can use GamingConsole interface to make it loosely coupled. So that, we don’t need to change our original code. In the future, we can create classes that implements GamingConsole interface (Polymorphism) and use it.
public class GameRunner {
  // public MarioGame game; // Tightly coupled to a specific game, so we need to change this.
  private final GamingConsole game; // Loosely coupled, it's not a specific game anymore. Games implement GamingConsole interface. Polymorphism.
  public GameRunner(GamingConsole game) {
  this.game = game;
  }

  public void run() {
  System.out.println("Running game: " + game);
  game.up();
  game.down();
  game.left();
  game.right();
  }
}
Spring Container
What is a Spring Container?
Spring Container is the core of the Spring Framework. The Spring Container will create the objects, wire them together, configure them, and manage their complete life cycle from creation till destruction. The Spring Container uses DI to manage the components that make up an application.
The Spring Container manages Spring beans and their life cycle.
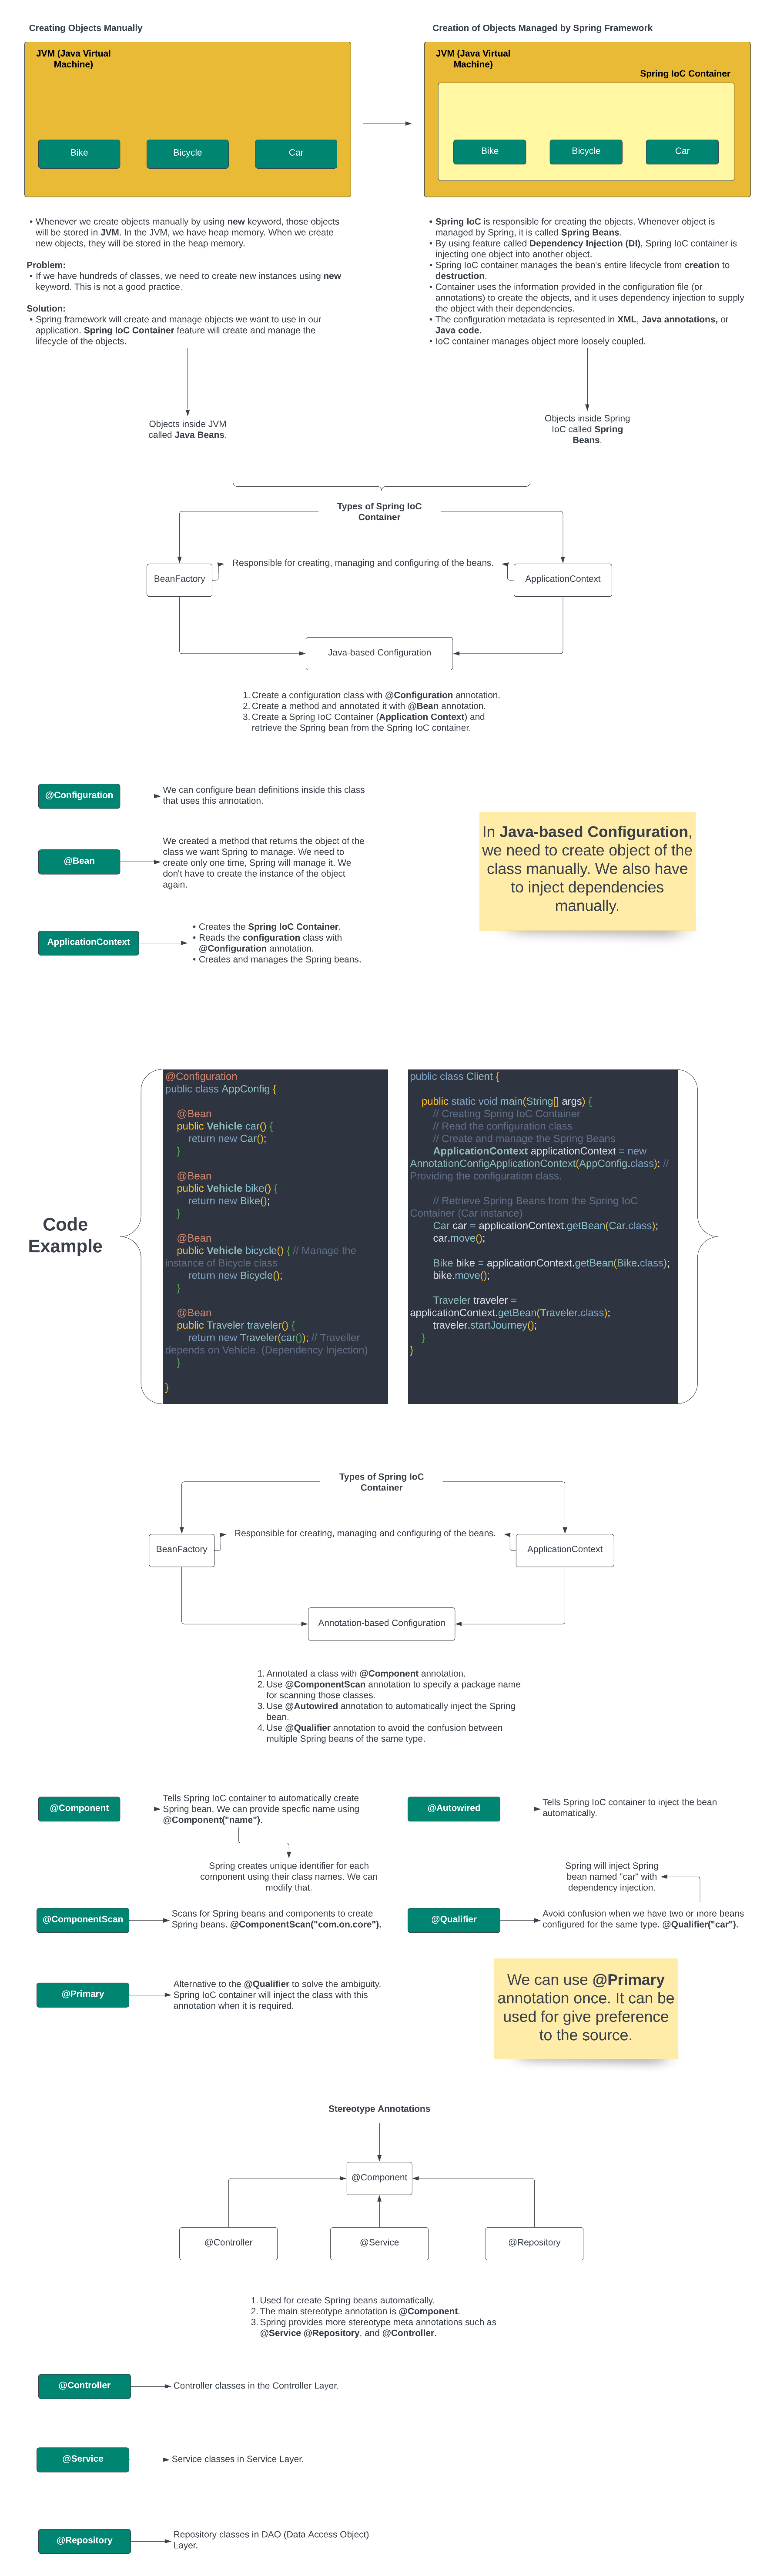
We have created POJOs (Plain Old Java Objects) and Configuration file. We passed them as inputs into Spring IoC Container. The Configuration file contains all of the beans. The output of Spring IoC Container is called Ready System.
JVM (Java Virtual Machine) is the container that runs the Java application. Spring Container is the container that runs the Spring application. JVM contains Spring Context.
Spring IoC container creates the runtime system for us. Creates Spring Context and manages beans for us.
Spring Container—Spring Context—Spring IoC Container
Different Types of IoC Containers
Spring provides two types of IoC containers:
- BeanFactory Container: Basic IoC container provided by Spring. It is the root interface for accessing a Spring BeanFactory. It is the simplest container provided by Spring.
- ApplicationContext Container: It is the advanced container provided by Spring. It is built on top of the BeanFactory container. It adds more enterprise-specific functionality like the ability to resolve textual messages from a properties file and the ability to publish application events to interested event listeners.
Most of the Spring applications use ApplicationContext container. It is recommended to use ApplicationContext container over BeanFactory container. (Web applications, web services, REST API and microservices)
Diagram Example
Difference between Java Bean, POJO and Spring Bean
POJO (Plain Old Java Object)
- A POJO is a simple Java object, without any dependency. It does not extend any class and does not implement any interface. It is a simple Java object that is used to transfer data from one layer to another.
- POJOs do not have any business logic. They are just simple data objects.
- POJOs are not thread-safe. They are not synchronized.
- POJOs do not have any dependency. They do not have any reference to any other object.
Java Bean
- A Java Bean is a POJO that follows some additional rules.
- Java Beans are serializable.
- Java Beans have a no-argument constructor.
- Java Beans have getter and setter methods.
- Java Beans are thread-safe. They are synchronized.
- Java Beans have a dependency. They have a reference to other objects.
Spring Bean
- A Spring Bean is a POJO that is managed by Spring IoC Container (ApplicationContext or BeanFactory).
Spring Bean Configuration
Spring Bean Configuration is the process of defining beans. The Spring Bean Configuration can be done in two ways:
- XML Based Configuration
- Annotation Based Configuration
How to list all beans managed by Spring Container?
We can list all beans managed by Spring Container using the following code:
public class ExampleClass {
  public static void main(String[] args) {
 ApplicationContext context = new AnnotationConfigApplicationContext(AppConfig.class);

 String[] beanNames = context.getBeanDefinitionNames();

 for (String beanName : beanNames) {
 System.out.println(beanName);
  }
  }
}
What if multiple matching beans are found?
If multiple matching beans are found, Spring will throw an exception. We can resolve this issue by using @Qualifier annotation.
Another option is to use @Primary annotation. If we use @Primary annotation, Spring will use the bean that is marked with @Primary annotation if nothing else is specified.
Primary vs Qualifier
@Primary annotation is used to specify the default bean to be used when multiple beans are available. @Qualifier annotation is used to specify the bean to be used when multiple beans are available.
What is the difference between @Component and @Bean?
- @Component annotation is used to mark a class as a bean so that the component-scanning mechanism of Spring can pick it up and pull it into the application context. @Component annotation is used with classes that we have written.
- @Bean annotation is used to mark a method as a bean so that the bean definition is generated and managed by the Spring container. @Bean annotation is used with methods that we have written.
- @Component annotation is used with classes that we have written.
- @Bean annotation is used with methods that we have written.
Dependency Injection
Dependency Injection is a design pattern that allows us to remove the hard-coded dependencies and make our code loosely coupled. It is a process whereby objects define their dependencies, that is, the other objects they work with, only through constructor arguments, arguments to a factory method, or properties that are set on the object instance after it is constructed or returned from a factory method. The container then injects those dependencies when it creates the bean. This process is fundamentally the inverse (hence the name, Inversion of Control) of the bean itself controlling the instantiation or location of its dependencies by using direct construction of classes, or a mechanism such as the Service Locator pattern.
Constructor Injection
Constructor Injection using @Autowired
public class Employee {
 private String name; private String email;
 @Autowired  public Employee(String name, String email) {
 this.name = name; this.email = email;  }
}
Constructor Injection using @Autowired and @Qualifier
public class Employee {
 private String name; private String email;
 @Autowired  public Employee(@Qualifier("name") String name, @Qualifier("email") String email) {
 this.name = name; this.email = email;  }
}
Constructor Injection using @Autowired and @Primary
public class Employee {
 private String name; private String email;
 @Autowired  public Employee(@Primary String name, String email) {
 this.name = name; this.email = email;  }
}
Setter Injection
public class BusinessService {
	@Autowired
	public void setDataService(DataService dataService) {
	  System.out.println("Setter injection");
	  this.dataService = dataService;
	}
}
Field Injection
public class BusinessService {
	@Autowired
	private DataService dataService;
}
Injection Example
@Component
class YourBusinessClass {
  Dependency1 dependency1;
  // @Autowired // Field injection is not recommended
  Dependency2 dependency2;

  // Constructor injection -> Autowired is not necessary, it automatically injects dependencies.
  @Autowired
  public YourBusinessClass(Dependency1 dependency1, Dependency2 dependency2) {
  System.out.println("Constructor injection");
  this.dependency1 = dependency1;
  this.dependency2 = dependency2;
  }

  @Override
  public String toString() {
  return "YourBusinessClass{" +
  "dependency1=" + dependency1 +
  ", dependency2=" + dependency2 +
  '}';
  }

  // @Autowired // Setter injection
  public void setDependency1(Dependency1 dependency1) {
  System.out.println("Setter injection");
  this.dependency1 = dependency1;
  }

  public void setDependency2(Dependency2 dependency2) {
  this.dependency2 = dependency2;
  }
}
Inversion of Control (IoC)
Inversion of Control (IoC) is a design principle in which the control of objects or portions of a program is transferred to a container or framework. Inversion of Control is a principle in software engineering by which the control of objects or portions of a program is transferred to a container or framework. The framework is responsible for managing the life cycle and the flow of control of the application.
In regular programming, the control of objects is in the hands of the programmer. The programmer creates objects, wires them together, puts them into a configuration, and then the objects are ready to be used by the application. Inversion of Control reverses this process. The objects are created by a framework, and the framework wires them together and puts them into a configuration. The application then uses the objects from the framework.
Dependency Injection (DI)
Dependency Injection (DI) is a software design pattern that implements Inversion of Control for software applications. The basic idea behind DI is to provide the required dependencies to a class through external sources rather than creating them inside the class. This external source is called a container. The container is responsible for creating the dependencies and injecting them into the class.
Example:
@Service
public class BusinessCalculationService {

 // BusinessCalculationService depends on DataService.
 // BusinessCalculationService does not know which implementation of DataService is used. BusinessCalculationService needs to talk to DataService.
 // DataService is a dependency of BusinessCalculationService.
 private final DataService dataService;

 @Autowired // Constructor injection
 public BusinessCalculationService(DataService dataService) {
 super(); // Not necessary
 this.dataService = dataService;  }

  public int findMax() {
 return Arrays.stream(dataService.retrieveData()).max().orElse(0);
  }
}
Auto Wiring
Auto Wiring is a process in which Spring automatically wires beans together by inspecting the beans and matching them with each other.
Eager vs Lazy Initialization
Eager initialization is the process of initializing a bean as soon as the Spring container is created. Lazy initialization is the process of initializing a bean when it is requested for the first time.
The default Spring behaviour is Eager initialization. We can change the default behaviour to Lazy initialization by using @Lazy annotation.
Eager initialization is the recommended approach. Because errors in the configuration are discovered immediately at application startup. We should use Lazy initialization only when we are sure that the bean will not be used.
@Component
class ClassA {}

@Component
@Lazy // ClassB will be created and initialized when it is requested. It will not be created and initialized at startup.
class ClassB {

  private final ClassA classA;

  // ClassB has a dependency on ClassA.
  @Autowired
  public ClassB(ClassA classA) {
  // Complex initialization logic goes here...
  // ClassB is using ClassA bean to initialize itself.
  System.out.println("Some initialization logic");
  this.classA = classA;
  }

  public void doSomething() {
  System.out.println("Doing something");
  }
}

@Configuration
@ComponentScan("com.onurcansever.learnspringframework.examples.d1")
public class LazyInitilizationLauncherApplication {
  public static void main(String[] args) {
  try(AnnotationConfigApplicationContext context = new AnnotationConfigApplicationContext(LazyInitilizationLauncherApplication.class)){
  // We have not requested ClassA bean (not calling it, not loading it); Spring is creating it and initializing it.
 // Even we have not requested ClassB bean (not calling it, not loading it); Spring is creating it and initializing it. To prevent this, we can use @Lazy annotation. Because by default, Spring creates and initializes all beans at startup. (Eager initialization)
  System.out.println("Initialization of context is completed.");

  // Initialization will happen when we request ClassB bean. (When somebody makes use of it)
  ClassB classB = context.getBean(ClassB.class);
  classB.doSomething();
  }

  }
}
Bean Scopes
Bean Scopes are used to define the lifecycle of a bean. There are five different bean scopes in Spring:
- Singleton
- Prototype
- Request
- Session
- Global Session
Singleton Scope
Singleton scope is the default scope of a bean. It means that only one instance of the bean will be created and shared among all the clients.
It creates only one instance of the bean, and that instance is shared among all the clients.
Stateless beans. (Doesn’t hold user information)
Prototype Scope
Prototype scope means that a new instance of the bean will be created every time a request is made for the bean.
It creates a new instance of the bean every time the bean is requested.
Stateful beans. (Holds user information)
To use Prototype scope, we need to use @Scope annotation with @Component annotation.
@Component
@Scope(value = ConfigurableBeanFactory.SCOPE_PROTOTYPE)
public class Employee {
 private String name; private String email;}
@Configuration
@ComponentScan
public class BeanScopesLauncherApplication {

  public static void main(String[] args) {
  try(AnnotationConfigApplicationContext context = new AnnotationConfigApplicationContext(BeanScopesLauncherApplication.class)) {

  Arrays.stream(context.getBeanDefinitionNames()).forEach(System.out::println);

  // Singleton: The reference in memory is the same. It creates only one instance. (Hash code is the same)
  System.out.println(context.getBean(NormalClass.class));
  System.out.println(context.getBean(NormalClass.class));

  // Prototype: The reference in memory is different. It creates a new instance every time. (Hash code is different)
  System.out.println(context.getBean(PrototypeClass.class));
  System.out.println(context.getBean(PrototypeClass.class));
  System.out.println(context.getBean(PrototypeClass.class));
  }
  }
}
Request Scope
Request scope means that a new instance of the bean will be created for each HTTP request.
Session Scope
Session scope means that a new instance of the bean will be created for each HTTP session.
Global Session Scope
Global Session scope means that a new instance of the bean will be created for each global HTTP session.
Java Singleton (GOF) vs Spring Singleton
- Java Singleton is a design pattern that restricts the instantiation of a class to one object. (One object instance per JVM)
- Spring Singleton is a bean scope that restricts the instantiation of a bean to one object. (One object instance per Spring IoC Container)
PostConstruct vs PreDestroy
- @PostConstruct annotation is used on a method that needs to be executed after dependency injection is done to perform any initialization. (ex: Fetching data from a database)
- @PreDestroy annotation is used on methods as a callback notification to signal that the instance is in the process of being removed by the container. (ex: Closing a database connection)
@Component
class SomeClass {
  private final SomeDependency someDependency;

  @Autowired
  public SomeClass(SomeDependency someDependency) {
  super();
  this.someDependency = someDependency;
  System.out.println("All dependencies are ready");
  }

  // As soon as bean is created, dependencies are injected, and then this method is called by Spring Framework.
  @PostConstruct
  public void initialize() {
  someDependency.getReady();
  }

  // Do something before bean is removed from the context and application is closed.
  @PreDestroy
  public void cleanUp() {
  System.out.println("Cleaning up");
  }

}
Jakarta Contexts and Dependency Injection (CDI)
Jakarta Contexts and Dependency Injection (CDI) is a standard for dependency injection and contextual lifecycle management for Java EE applications. It is a part of Jakarta EE. Spring Framework implements CDI specification.
- Named: @Named -> @Named(“name”) is used to specify the name of the bean. Alternatively, we can use @Component annotation.
- Inject: @Inject -> @Inject is used to inject a dependency. Alternatively, we can use @Autowired annotation.
- Qualifier: @Qualifier -> @Qualifier(“name”) is used to specify the name of the bean. Alternatively, we can use @Qualifier annotation.
- Scope: @Scope -> @Scope(“name”) is used to specify the scope of the bean. Alternatively, we can use @Scope annotation.
Add following as a dependency to the pom.xml file.
<dependency>
  <groupId>jakarta.inject</groupId>
 <artifactId>jakarta.inject-api</artifactId>
 <version>2.0.1</version>
</dependency>
// @Component
@Named
class BusinessService {
  private DataService dataService;

  public DataService getDataService() {
  return dataService;
  }

  // @Autowired
  @Inject
  public void setDataService(DataService dataService) {
  System.out.println("Setter injection");
  this.dataService = dataService;
  }
}
Spring XML Configuration
Spring XML Configuration is a way of configuring Spring beans using XML files. We can configure beans using XML files instead of using annotations.
Steps to configure Spring beans using XML files:
- Create a Spring configuration file (ex:
beans.xml) undersrc/main/resourcesfolder. - Add the following XML code to the
beans.xmlfile.
<?xml version="1.0" encoding="UTF-8"?>
<beans xmlns="http://www.springframework.org/schema/beans"
 xmlns:xsi="http://www.w3.org/2001/XMLSchema-instance"
 xmlns:context="http://www.springframework.org/schema/context" xsi:schemaLocation="
 http://www.springframework.org/schema/beans http://www.springframework.org/schema/beans/spring-beans.xsd http://www.springframework.org/schema/context http://www.springframework.org/schema/context/spring-context.xsd"> <!-- bean definitions here -->
  <bean id="name" class="java.lang.String">
  <constructor-arg value="Onur" />
  </bean>

 <context:component-scan base-package="com.onurcansever.learnspringframework.game" />
  </beans>
- constructor-arg tag is used to inject a dependency to a constructor.
- property tag is used to inject a dependency to a setter method.
- context:component-scan tag is used to scan for components.
To make use of the Spring configuration file, we need to add the following code to the main method.
public class XmlExample {
  public static void main(String[] args) {
 ClassPathXmlApplicationContext context = new ClassPathXmlApplicationContext("beans.xml");
 Employee employee = context.getBean("employee", Employee.class);
 System.out.println(employee);
 context.close();
  }
}
Spring Stereotype Annotations
- @Component: @Component is a generic stereotype for any Spring-managed component. It is a general-purpose annotation. It is a meta-annotation that serves as a specialization of @Component for different use cases.
- @Service: @Service is a specialization of @Component for service layer. Indicates that an annotated class has business logic.
- @Controller: @Controller is a specialization of @Component for presentation layer. Indicates that an annotated class is a “Controller” (e.g. a web controller, REST API).
- @Repository: @Repository is a specialization of @Component for persistence layer. Indicates that an annotated class is a “Repository” (e.g. a DAO). Used to retrieve and/or manipulate data from a database.
Why?
- Giving more information to the framework about our intentions.
- We can use AOP at a later point to add additional behaviour such as: for @Repository, Spring framework automatically wires in JDBC exception translation. (ex: SQLException -> DataAccessException)
@Service
public class BusinessCalculationService {

  // BusinessCalculationService depends on DataService.
  // BusinessCalculationService does not know which implementation of DataService is used. BusinessCalculationService needs to talk to DataService.
  // DataService is a dependency of BusinessCalculationService.
  private final DataService dataService;

  @Autowired // Constructor injection
  public BusinessCalculationService(DataService dataService) {
  super(); // Not necessary
  this.dataService = dataService;
  }

  public int findMax() {
  return Arrays.stream(dataService.retrieveData()).max().orElse(0);
  }
}
Spring Big Picture - Framework, Modules and Projects
- Spring Core: IoC Container, Dependency Injection, Auto Wiring… (Building web applications, creating REST API, implementing authentication and authorization, talking to a database, integrating with other systems, writing great unit tests, etc.)
The Spring Framework contains multiple Spring Modules:
- Fundamental Features: Core (IoC Container, Dependency Injection, Auto Wiring)
- Web: Spring MVC (Web Applications, REST API)
- Web Reactive: Spring WebFlux
- Data Access: JDBC, JPA etc.
- Integration: JMS etc.
- Testing: Mock Objects, Spring MVC Test etc.
Why is Spring Framework divided into multiple modules?
- Each application can choose modules that it needs.
- Application doesn’t need to use every module.
Spring Projects
- Application architectures evolve continuously:
- Web > Rest API > Microservices > Cloud > …
- Spring evolves through Spring Projects:
- First Project: Spring Framework
- Spring Security: Secure your web application or REST API or microservice.
- Spring Data: Integrate the same way with different types of databases: NoSQL and Relational.
- Spring Integration: Address challenges with integration with other applications.
- Spring Boot: Popular framework to build microservices.
- Spring Cloud: Build cloud-native applications.
Why is Spring Ecosystem popular?
- Loose Coupling: Spring manages creating and wiring of beans and dependencies. It makes it maintainable and writing unit tests easily.
- Reduced Boilerplate Code: Spring provides a lot of annotations to reduce boilerplate code. No exception handling.
- Architectural Flexibility: Spring Modules and Projects.
- Evolution with Time: Microservices and Cloud. (Spring Boot, Spring Cloud etc.)
Extra Notes
// Performs scan for components in the same package (if we don't specify basePackages, it will scan the package of the class)
@ComponentScan
// Tell Spring where to search for beans (components) -> package
@ComponentScan(basePackages = "com.onurcansever.learnspringframework.game")
Spring Boot Notes
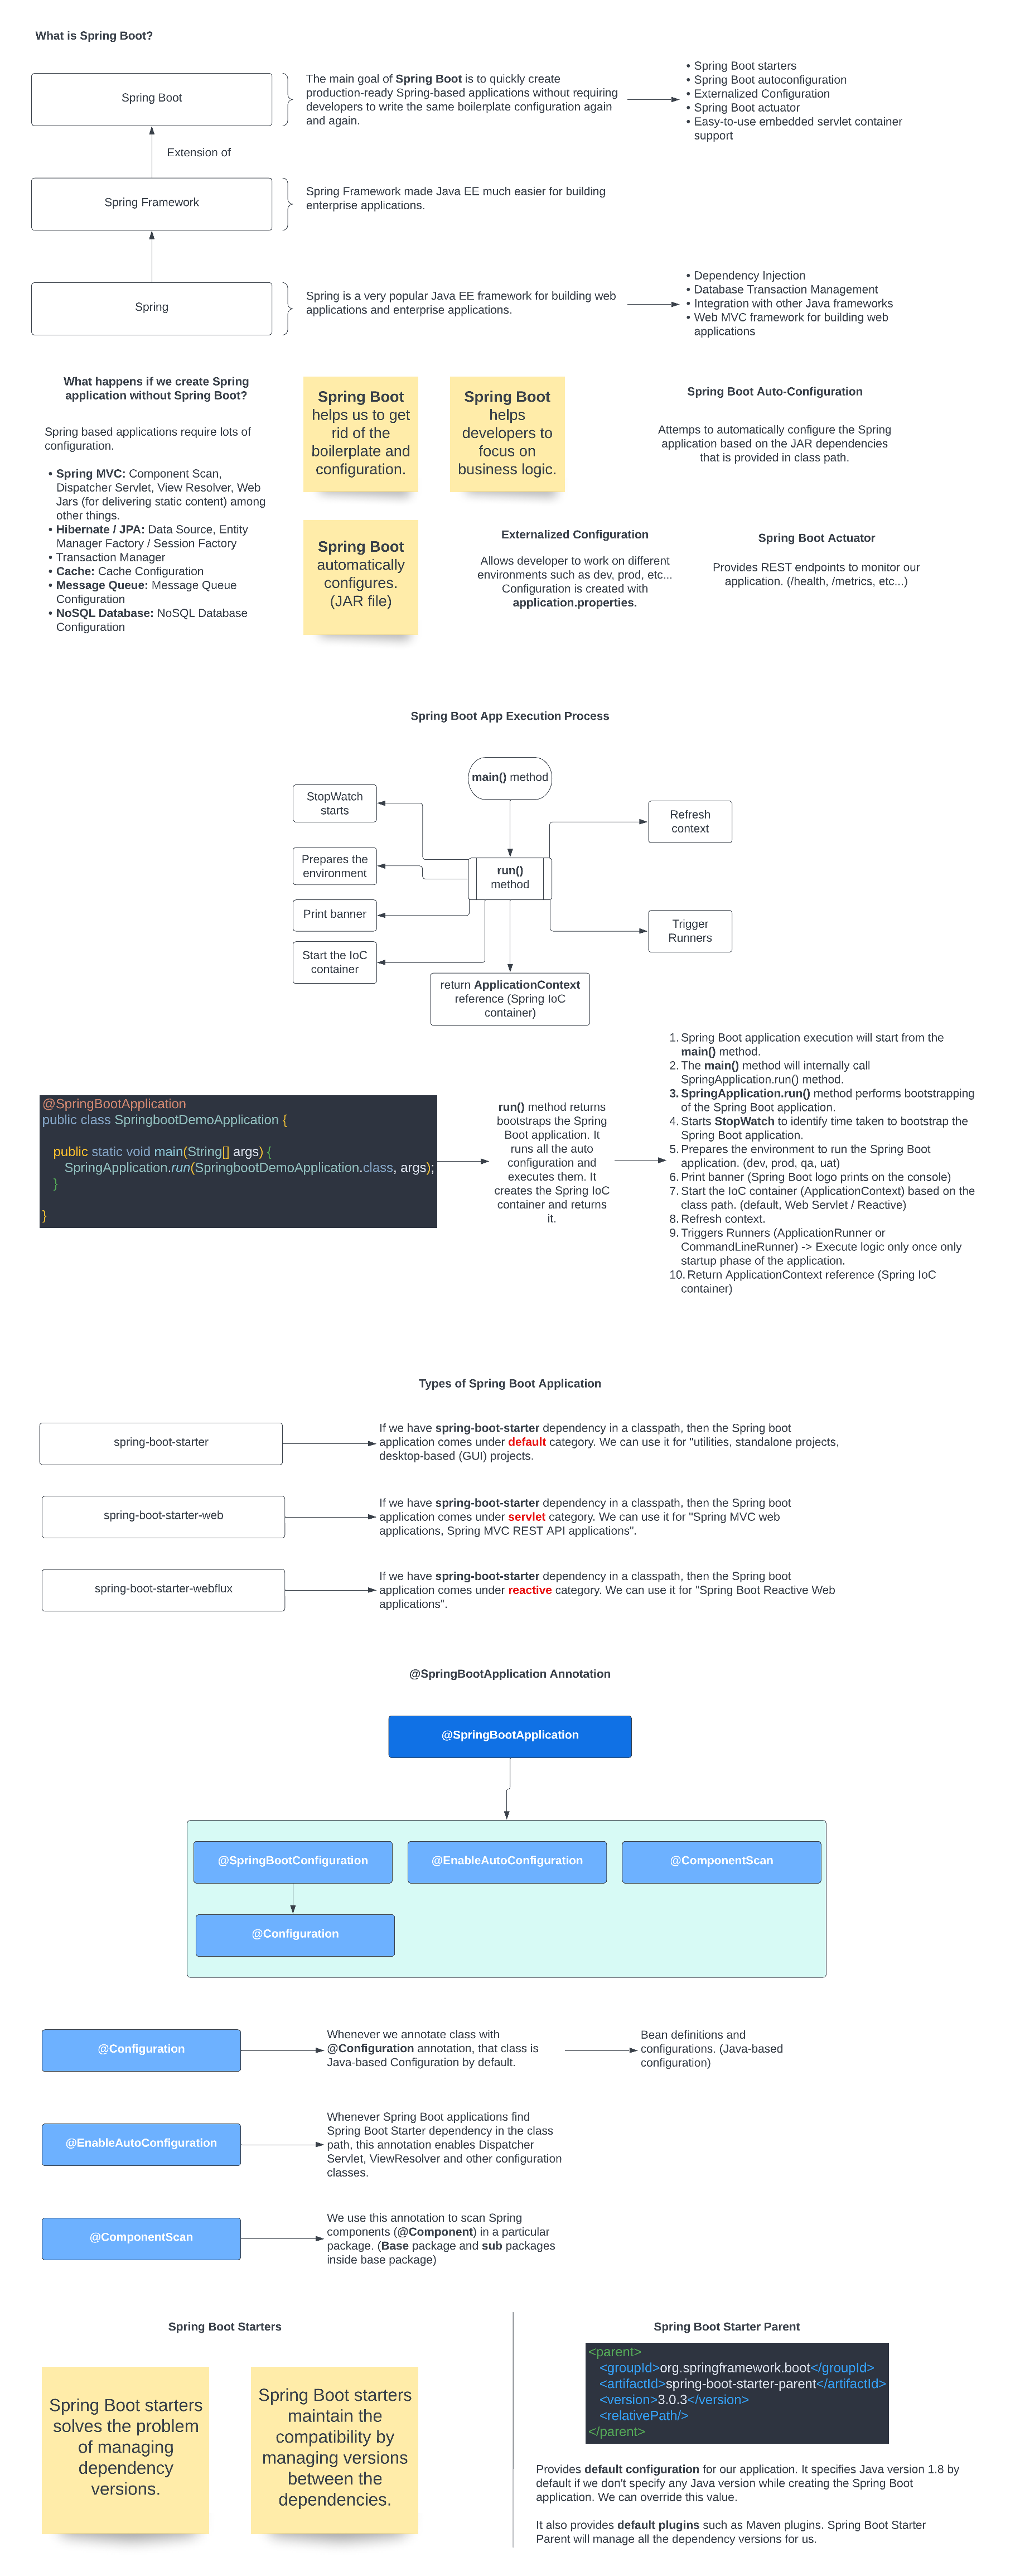
Goal of Spring Boot
- Help us to build production-ready applications quickly.
Quickly
- Spring Initializr
- Spring Boot Starter Projects: Quickly define dependencies.
- Spring Boot Auto Configuration: Automatically provide configuration based on dependencies in the class.
- Spring Boot DevTools: Help us to make changes to the application without restarting the application.
To add Spring Boot DevTools to the project, add the following dependency to the pom.xml file:
<dependency>
  <groupId>org.springframework.boot</groupId>
 <artifactId>spring-boot-devtools</artifactId>
 <scope>runtime</scope>
 <optional>true</optional>
</dependency>
If we change anything in pom.xml, we need to restart manually.
Production-ready
- Logging
- Different Configurations for Different Environments (Profiles, ConfigurationProperties)
- Monitoring (Spring Boot Actuator)
Managing Application Configuration using Profiles
- Application have different environments: development, test, production.
- A different environment needs different configurations for the same application. (Different databases, different web service, etc.)
- Profiles allow us to define different configurations for different environments.
We can create separate application.properties files and configurations for each environment.

dev:
logging.level.org.springframework=trace
qa
stage
prod:
logging.level.org.springframework=info
For example, to create a profile for development environment, we can create a file named application-dev.properties in the src/main/resources folder.
logging.level.org.springframework=trace
By default, Spring Boot uses the application.properties file. To use the application-dev.properties file, we need to specify the profile in the application.properties file.
spring.profiles.active=dev
Values from the default configuration and the profile-specific configuration are merged. If there is a conflict, the profile-specific configuration wins.
Spring Boot Starter Projects
- We need a lot of frameworks to build a web application.
- For example, building a REST API, we need: Spring, Spring MVC, Tomcat, JSON conversion (from the Java list of courses to JSON list) etc.
- Writing unit tests, we need: JUnit, Mockito, Spring Test etc.
Spring Boot Configuration Properties
Setting up complex configuration example:
Inside the application.properties file, we can define the following properties:
currency-service.url=
currency-service.username=
currency-service.key=
How does Spring Boot help us manage application configuration? How can we define a property value and use it in the application?
- If we want to create a lot of application configurations, we can create a separate class for each configuration called ConfigurationProperties.
import org.springframework.boot.context.properties.ConfigurationProperties;
import org.springframework.stereotype.Component;

// Mapped to the properties file.
@ConfigurationProperties(prefix = "currency-service") // Prefix@Component
public class CurrencyServiceConfiguration {

 private String url; private String username; private String key;
  public String getUrl() {
 return url;  }

  public void setUrl(String url) {
 this.url = url;  }

  public String getUsername() {
 return username;  }

  public void setUsername(String username) {
 this.username = username;  }

  public String getKey() {
 return key;  }

  public void setKey(String key) {
 this.key = key;  }
}
- We can also override the default configuration in another profile. For example, in the
application-dev.propertiesfile, we can override the default configuration.
currency-service.url=http://dev.example.com
currency-service.username=devusername
currency-service.key=devkey
Simply Deployment with Spring Boot Embedded Servers
- We need to simplify the deployment of our application because we have multiple environments such as development, test, production, etc. (Make JAR not WAR)
Clean Maven Build:
mvn clean install
Run the application:
java -jar target/spring-boot-0.0.1-SNAPSHOT.jar
File path:
/Users/admin/Desktop/java-spring-boot-udemy/learn-spring-boot/target/
learn-spring-boot-0.0.1-SNAPSHOT.jar
Monitor Applications using Spring Boot Actuator
- Monitor and manage our application in production.
- Provides a number of endpoints:
- beans: Complete list of Spring beans in the application.
- health: Application health information.
- metrics: Application metrics information.
- mappings: Details around Request Mappings.
How to add Spring Boot Actuator to the project?
- Add the following dependency to the
pom.xmlfile:
<dependency>
  <groupId>org.springframework.boot</groupId>
 <artifactId>spring-boot-starter-actuator</artifactId>
</dependency>
How to access the endpoints?
- We can access the endpoints using the following URL:
http://localhost:8080/actuator
We can add more features by enabling the following properties in the application.properties file:
management.endpoints.web.exposure.include=*
If we include lots of endpoints, it will consume more CPU and memory. So, we can include only the endpoints that we need.
management.endpoints.web.exposure.include=beans,health,info
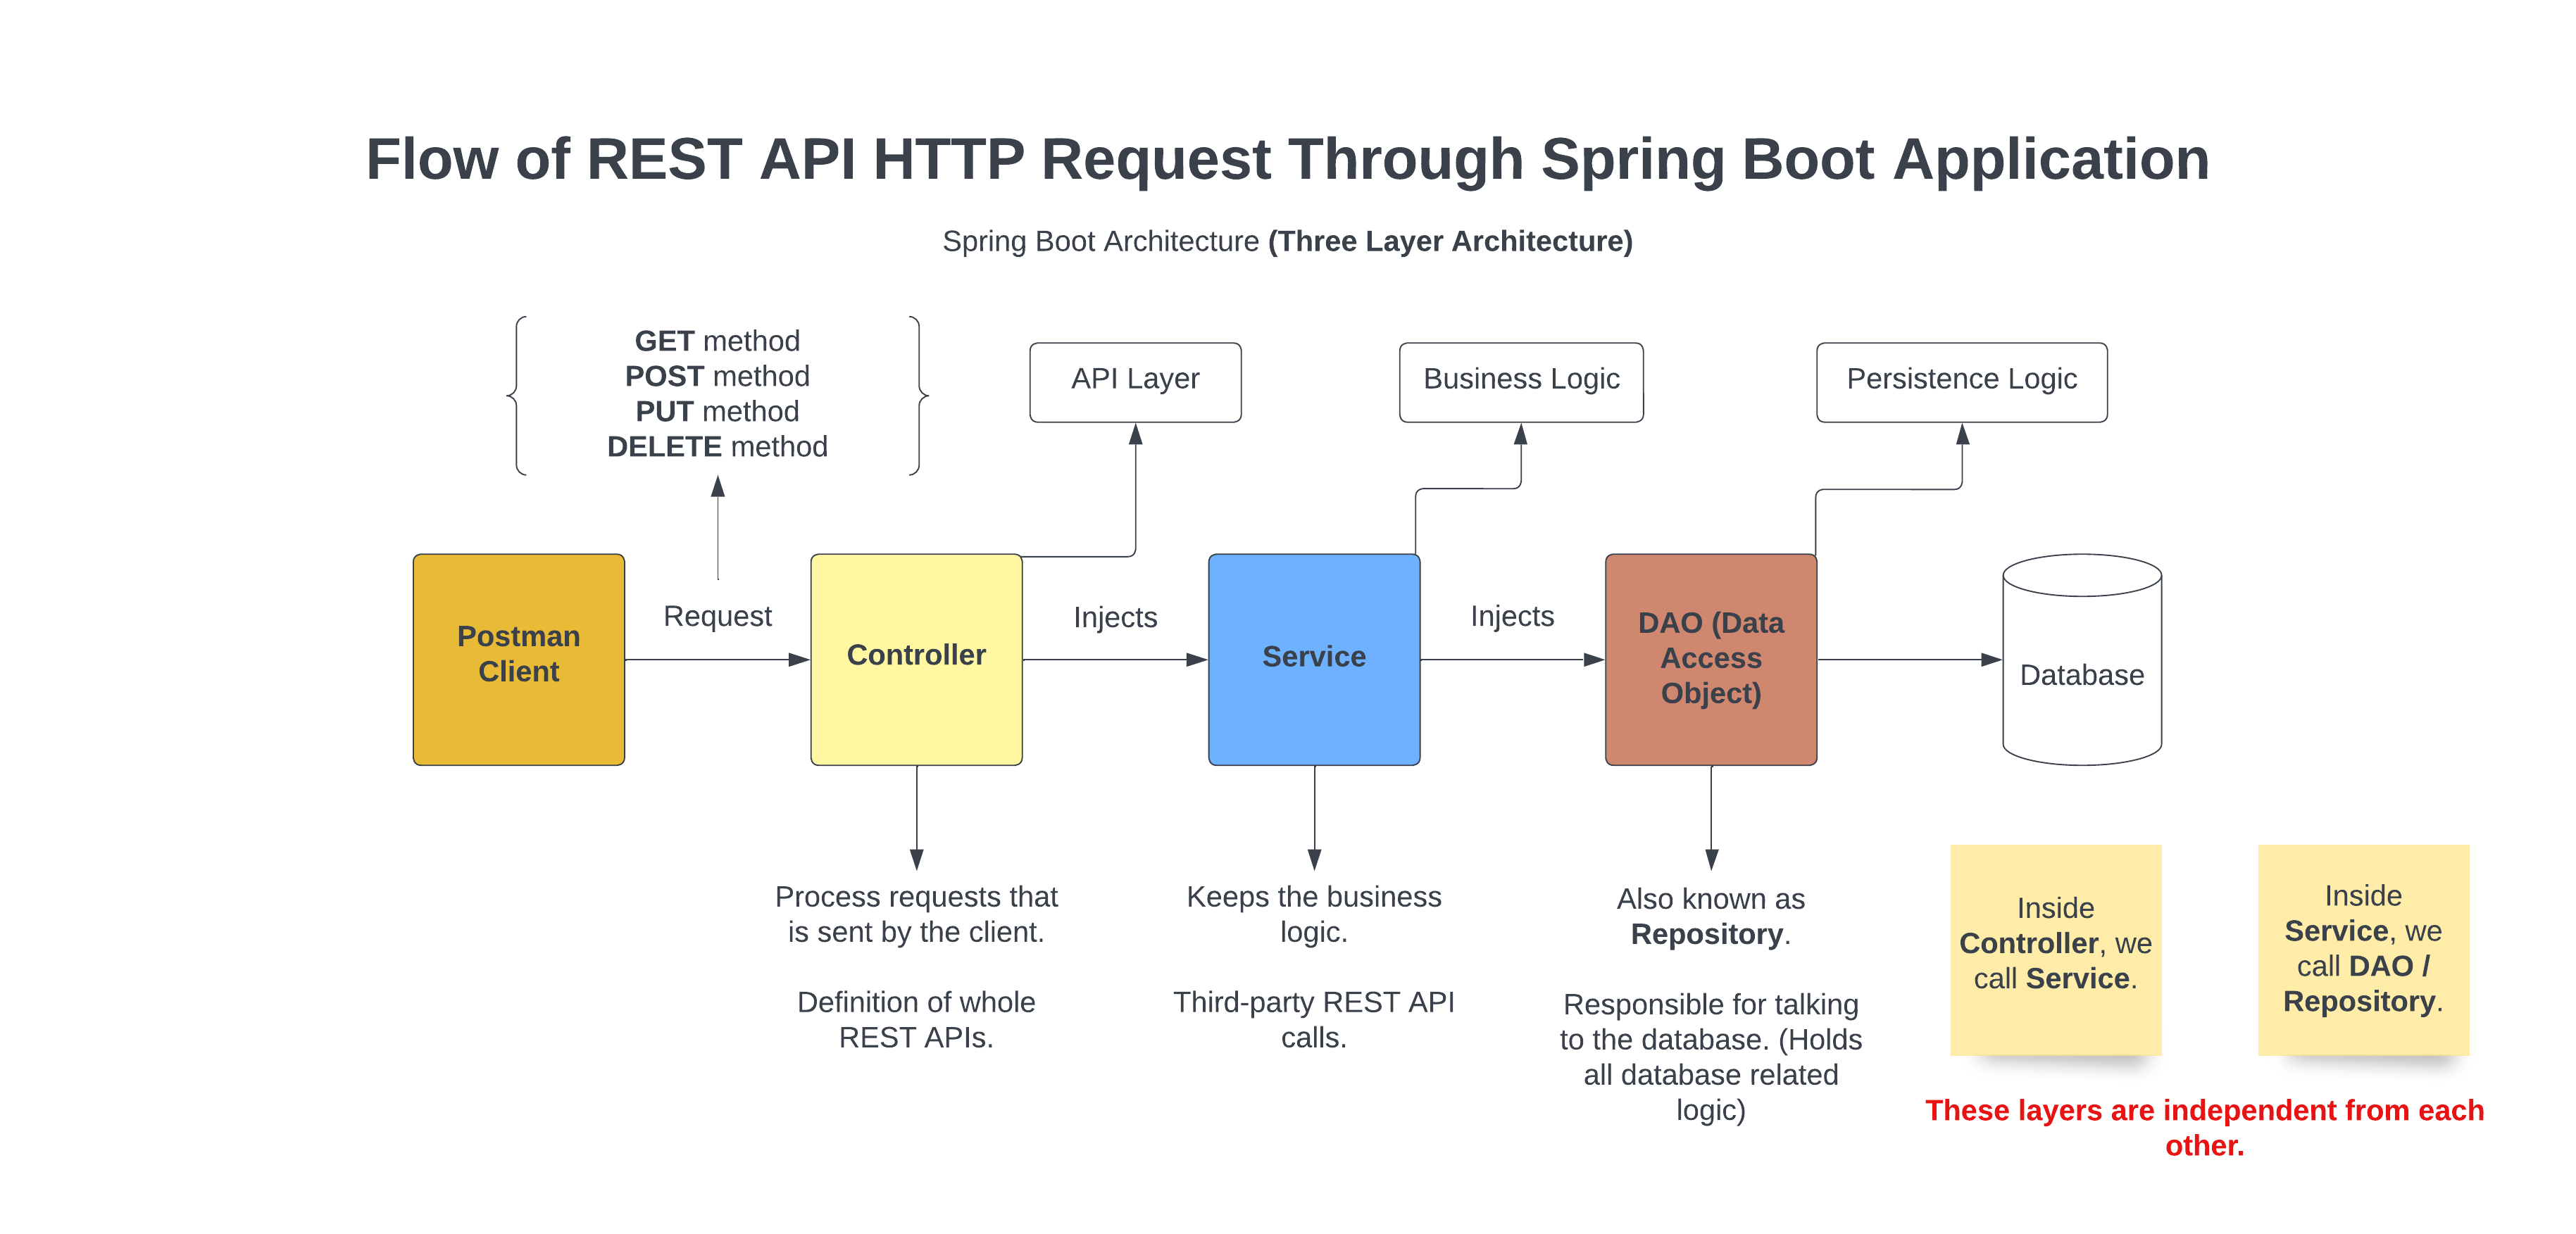
Three Layer Architecture
Spring Boot vs Spring MVC vs Spring
- Spring Framework: Dependency Injection and other Spring framework features.
(Spring Modules and Spring Projects) - Spring MVC (Spring Module): Simplify the development of web applications and RESTful web services. (@Controller, @RestController, @RequestMapping)
- Spring Boot (Spring Project): Quickly build production-ready applications. (Starter projects and autoconfiguration)
- Enables non functional requirements (NFRs):
- Embedded Servers
- Actuator
- Logging and Error Handling
- Profiles and Configuration Properties
Spring JDBC, H2 Database, Hibernate, JPA Notes
- H2 Database: In-memory database.
- Connection to H2 Database:
conn0: url=jdbc:h2:mem:bdfa2bb8-4131-4dce-96c4-550927009ec5 user=SA - In
application.properties, setspring.h2.console.enabled=true - To access console, go to
http://localhost:8080/h2-console/ - Copy and paste
jdbc:h2:mem:f30911dd-9715-4a83-9d4a-880d582be6a7into JDBC URL. This is a dynamic URL which changes every restart. We can configure static URL. - To configure static URL, add
spring.datasource.url=jdbc:h2:mem:testdbinapplication.properties. This will create a database calledtestdbin memory.
If we want to use JDBC, JPA, Spring Data JPA, Hibernate etc. To do that, we need to create tables in the H2 database.
We need to create a file called schema.sql in src/main/resources folder. This file will contain the SQL statements to create the tables.
CREATE TABLE course
(
    id BIGINT NOT NULL,
    name VARCHAR(255) NOT NULL,
    author VARCHAR(255) NOT NULL,
    PRIMARY KEY (id)
);
JDBC (Java Database Connectivity)
- JDBC is a Java API to connect to a database.
- Write a lot of SQL queries.
- More Java code.
Spring JDBC
- Spring JDBC is a framework that provides a simple, lightweight, and fast way to access the database.
- Write a lot of SQL queries.
- Lesser Java code.
We will execute the code below using Spring JDBC.
INSERT INTO course (id, name, author)
VALUES (1, 'Learn AWS', 'Onur');

SELECT * FROM course;

DELETE FROM course WHERE id = 1;
@Repository // Class talks to a database.
public class CourseJdbcRepository {
    // To run queries using Spring JDBC, we need to use JdbcTemplate.

    @Autowired // Spring will inject the JdbcTemplate object.
    private JdbcTemplate springJdbcTemplate;
    private static String INSERT_QUERY =
            """
            INSERT INTO course (id, name, author)
            VALUES (?, ?, ?);
            """;

    private static String DELETE_QUERY =
            """
            DELETE FROM course
            WHERE id = ?;
            """;

    private static String SELECT_QUERY =
            """
            SELECT * FROM course
            WHERE id = ?;
            """;

    public void insert(Course course) {
        springJdbcTemplate.update(INSERT_QUERY, course.getId(), course.getName(), course.getAuthor()); // Insert, Update, Delete
    }

    public void deleteById(long id) {
        springJdbcTemplate.update(DELETE_QUERY, id);
    }

    public Course findById(long id) {
        // Single Row
        // ResultSet -> Bean => Row Mapper
        return springJdbcTemplate.queryForObject(SELECT_QUERY, new BeanPropertyRowMapper<>(Course.class), id);

        // When we execute SELECT_QUERY, we need to map it because SELECT_QUERY returns multiple rows. (Kind of like a table) -> RowMapper

        // Take the ResultSet and map it to the Course bean. -> RowMapper (They map each row in the ResultSet to a bean.)

        // If we get null values, we need to add Setters to the Course class.
    }
}
JPA (Java Persistence API)
- JPA is a Java API to connect to a database.
- Map Entities to Tables.
- Make use of EntityManager.
@Repository // Class talks to a database.
@Transactional // We want to make use of JPA, so we need to use @Transactional.
public class CourseJpaRepository {
    // If we want to make use JPA talk to the database, we need to use EntityManager.

    // @Autowired // Spring will inject the EntityManager object.
    @PersistenceContext // PersistenceContext is a better way to inject the EntityManager object.
    private EntityManager entityManager;

    public void insert(Course course) {
        entityManager.merge(course); // Insert a row.
    }

    public Course findById(long id) {
        // We want to find Course, so we pass Course.class as the first parameter.
        return entityManager.find(Course.class, id); // Find a row.
    }

    public void deleteById(long id) {
        Course course = entityManager.find(Course.class, id);
        entityManager.remove(course); // Delete a row.
    }
}
Spring Data JPA
- Spring Data JPA is a framework that provides a simple, lightweight, and fast way to access the database.
- It makes JPA easy to use. It configures EntityManager.
// This is a Spring Data JPA Repository
// We need to create an interface and extend JpaRepository.
// We need to pass the entity class (Course) and the primary key type.
public interface CourseSpringDataJpaRepository extends JpaRepository<Course, Long> {
    // We can add custom methods to this interface.
    // Spring Data JPA will implement these methods.
    // Spring Data JPA will create a proxy object for this interface.

    // Search by author.
    // Follow naming conventions. We are searching by author, so we need to name the method findByAuthor.
    List<Course> findByAuthor(String author);
    List<Course> findByName(String name);
}
Hibernate vs JPA
- JPA is a specification. It is an API. (How to define entities, How to map attributes, Who manage the entities)
- Hibernate is an implementation of JPA.
- Using Hibernate will lock us to Hibernate. We cannot use other implementations of JPA. (Toplink, EclipseLink, OpenJPA)
Executing Queries using CommandLineRunner
@Component // This class is a Spring Bean.
public class CourseCommandLineRunner implements CommandLineRunner {
    // We want to execute this query at the start of the application. To do that, we need to create a CommandLineRunner.
    // We need to implement the run method of CommandLineRunner.
    // We need to create a Spring Bean of this class. To do that, we need to add @Component annotation.
    // We need to create a CourseJdbcRepository object.

    // @Autowired
    // private CourseJpaRepository repository;

    @Autowired // Spring will inject the CourseSpringDataJpaRepository object.
    private CourseSpringDataJpaRepository repository;

    // Using Spring Data JPA, EntityManager is handled by Spring Data JPA.

    @Override
    public void run(String... args) throws Exception {
        repository.save(new Course(1, "Learn AWS", "Onur")); // Insert or Update
        repository.save(new Course(2, "Learn Azure", "Onur"));
        repository.save(new Course(3, "Learn DevOps", "Onur"));
        repository.save(new Course(4, "Learn Docker", "Onur"));

        repository.deleteById(1l);

        System.out.println(repository.findById(2l));
        System.out.println(repository.findById(3l));

        repository.findAll().forEach(System.out::println);
        System.out.println(repository.count());

        System.out.println(repository.findByAuthor("Onur"));
        System.out.println(repository.findByName("Learn Docker Now"));
    }
}

/*
@Component // This class is a Spring Bean.
public class CourseJdbcCommandLineRunner implements CommandLineRunner {
    // We want to execute this query at the start of the application. To do that, we need to create a CommandLineRunner.
    // We need to implement the run method of CommandLineRunner.
    // We need to create a Spring Bean of this class. To do that, we need to add @Component annotation.
    // We need to create a CourseJdbcRepository object.

    @Autowired // Spring will inject the CourseJdbcRepository object.
    private CourseJdbcRepository repository;

    @Override
    public void run(String... args) throws Exception {
        repository.insert(new Course(1, "Learn AWS", "Onur"));
        repository.insert(new Course(2, "Learn Azure", "Onur"));
        repository.insert(new Course(3, "Learn DevOps", "Onur"));

        repository.deleteById(1);

        System.out.println(repository.findById(2));
        System.out.println(repository.findById(3));
    }
}
 */
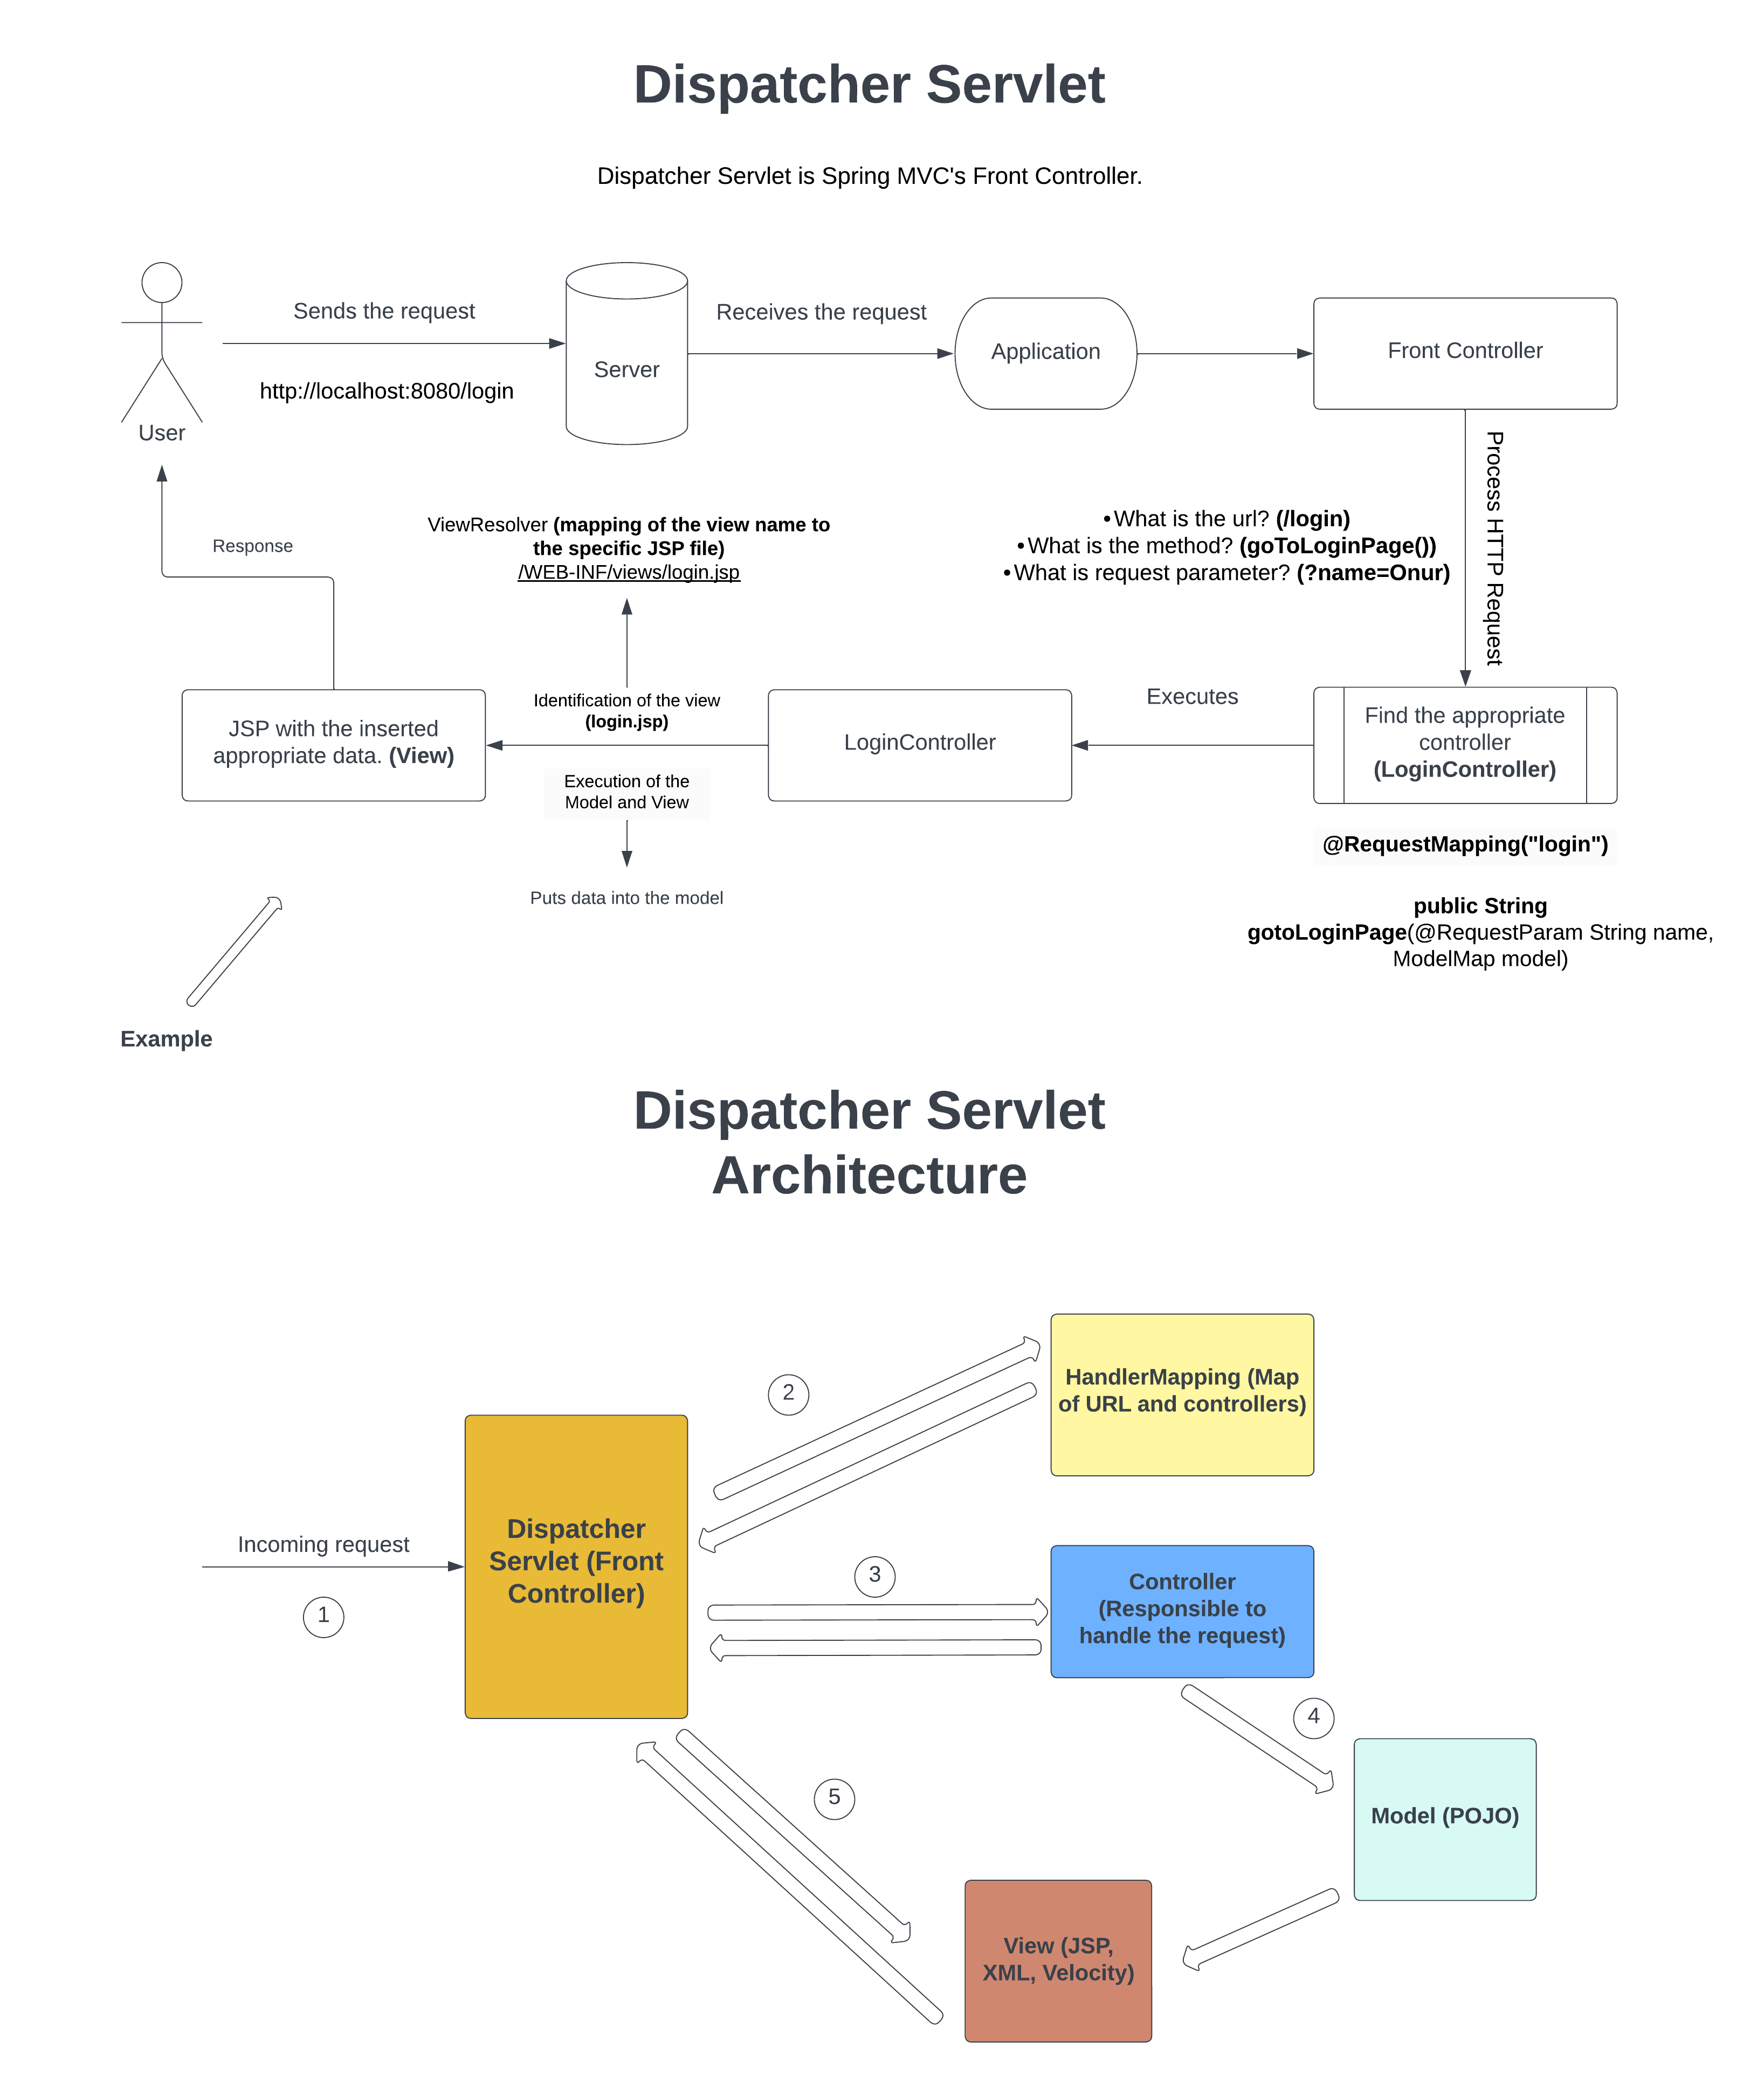
How Dispatcher Servlet Works Behind the Scenes